
So I invite you to read the blog.
Open InDesign, I get the welcome screen so choose the option DOCUMENT

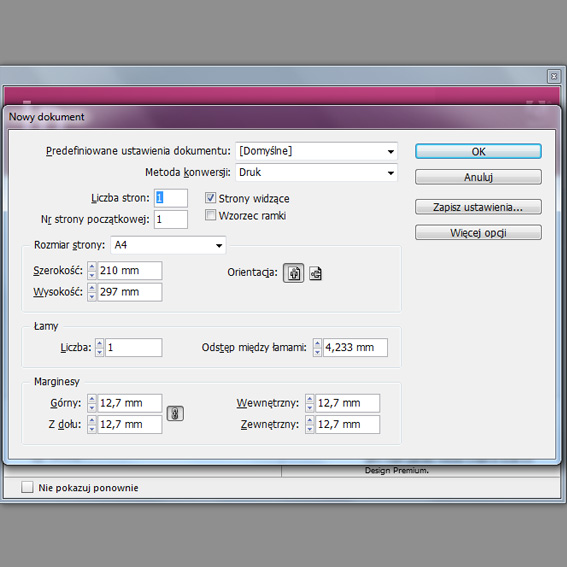
Another window appears, here we can choose what setting you want, I leave the default, but A4 in landscape view.
click OK. As you can see there is a new document. Now go to the top menu, from which we choose FILE -PLACE (CTRL + D) and choose the things you need to create a gallery, I choose at the beginning of the photos you want to put in my gallery. Select all the images and click OPEN. Now just click on your documentwith your mouse and have our pictures are added. Then let's get to the settings view. In the upper part of theprogram is a drop-down list from which you can select different view options, select NEW in CS5.5

Now order all the pictures so that one was behind the other. This can be done easily. Use your mouse toselect all pictures in one stroke, you will see new options.

If you already have everything arranged, we can proceed to further work. Now we are creating the buttons forour gallery. Select the Polygon tool and create an arrow to our gallery

Draw a polygon anywhere on your document.

If you already have a polygon that we have to do with his arrows, of course it is a simple task, select thescissors tool and select a point at the top and bottom of our polygon.

As you can see the object split into two parts. Now, using your mouse, select the most part, and pressDELETE, thanks to our object of this operation will change to an arrow

If we have one arrow then we also have a second, in this, select your object and using CTRL+C CTRL+Vcopy and paste an item anywhere.

OK, now with the mouse arrow to inverse one to the other side and would place the two items in the appropriate place for themselves

Now we can change the color or opacity of the arrows, we must first select, using the SHIFT key to select thetwo elements. Now just go in the top menu and select the appropriate coverage of our items.

Well, almost everything. Now only the functionality we need to give our gallery and we are ready to effect.
To do this, select all the images that you want to change and go to the UNITED STATES OF OBJECTS, then select the new layer.

The next step. Go to the BUTTONS and click the right arrow key. Now let's move on to the window and thereBUTTONS click on the tiny cross from the available options, select GO TO NEXT STATE

Then, with the option APPEARANCE, select the first item and the last

Do the same with the arrow on the left, just from the list, select GO TO THE PREVIOUS CONDITION. Well,that's all, now you can choose to preview and press the little button as PLAY and see our gallery of works.

If you want to add additional buttons, place them with CTRL+D on your document

To our buttons work properly perform similar steps as with the previous buttons. Go to the KEYS panel,select the first button, choose a small cross and the drop-down list to select GO TO THE STATE

Now we have to go and give this button a state, that is, it will be our first picture, so scroll down and drop-down list, select STATE - STATE 1

Now, just hook up the other buttons. If you select the button 2 is a state must be STATE 2, button 3 - STATE3, button 4 - STATE 4 and a total is the end of this guide.
I hope I helped you, if so, I invite you also to subscribe to my channel on Youtube!
If you want to learn about Graphics Design, open-tutor.com is the best platform for you. It provides online graphic design, Adobe Photoshop and Illustrator Tutorials for beat career building. Open-tutor.com also offer latest update of Jobs Circular in Bangladesh. Visit open-tutor.com for more details and updates.
OdpowiedzUsuń